Easy Peanut Butter Protein Bars No-Bake
Looking for a quick snack? Discover my Easy Peanut Butter Protein Bars No-Bake, made with creamy peanut butter and delicious oats. Ideal for busy days!

- A Snack Made in Heaven: The Easy Peanut Butter Protein Bars No-Bake
- Delicious and Nutritious: A Brief Recipe Overview
- Big Benefits of These Protein-Packed Treats
- Ready to look into In? Here’s What You’ll Need
- The Essential Ingredients Guide to No-Bake Protein Bars
- Mastering Professional Cooking: From Prep to Perfect Dishes
- Pro Tips & Secrets for Easy Peanut Butter Protein Bars No-Bake
- Storage & Make-Ahead
- Creative Variations
- Complete Nutrition Guide
- Expert FAQ Solutions
- Recipe Card
A Snack Made in Heaven: The Easy Peanut Butter Protein Bars No-Bake
Picture this: it’s 3 pm on a tuesday. i’m knee-deep in the chaos of everyday life. i’ve got a ton of stuff to finish before dinner, and my energy levels are crashing faster than my ensoiasm for another boring snack.
Cue the easy peanut butter protein bars no-bake . seriously, these bars are like a hug in a rectangular shape. if you've ever found yourself rummaging through the pantry for something that’s both delicious and healthy, you’re gonna love these!
Honestly, the first time i made these, i was a bit of a hesitant cook—flops and fails were my frequent companions.
But this recipe? it’s so forgiving that even a rookie can pull it off. if you can mix ingredients without burning the kitchen down, you can do this.
I mean, who wouldn’t want a snack that’s ready in just 45 minutes and requires zero baking? yup, no oven required! time to channel your inner snack master.
Delicious and Nutritious: A Brief Recipe Overview
Looking back, the roots of these bars can be traced to the rise of the health food movement (thanks, granola !).
Since then, they’ve become a staple—not just for fitness buffs, but for families, busy professionals, and kids alike. need a boost before your workout? these bars are ready to help.
Want something quick and filling for breakfast? say no more!
These bad boys are not only easy protein bars to whip up, but they’re also wallet-friendly. depending on what you have in your pantry, you might be looking at about $10-$15 total for 12 bars.
That’s some budget-friendly deliciousness right there! plus, they keep well in the fridge, making them a fantastic option for meal prep snacks.
Big Benefits of These Protein-Packed Treats
So, what’s the deal with these bars? first off, let’s talk health benefits . peanut butter is loaded with protein and healthy fats, and when you toss in some rolled oats, you’re getting fiber too.
With these guys, you’re not just snacking; you’re fueling your body, making them perfect for after workouts or a super fulfilling breakfast.
And i can’t forget about how versatile they are! you can customize these to your heart’s desire. want vegan protein bars ? swap in plant-based protein.
Nuts not your jam? toss in some dried fruit or chocolate chips instead. you can truly play around until you get your ideal flavor and texture.
They also work great for special occasions—think lunch boxes, after-school snacks, or even healthy dessert alternatives that don't make you feel guilty.
Compared to traditional store-bought snacks, these homemade protein bars come out on top. they’re usually lower in sugar, free from weird ingredients, and you can practically guarantee what’s going inside.
Plus, no one’s gonna stop you if you decide to sneak in that extra scoop of chocolate chips!
Ready to look into In? Here’s What You’ll Need
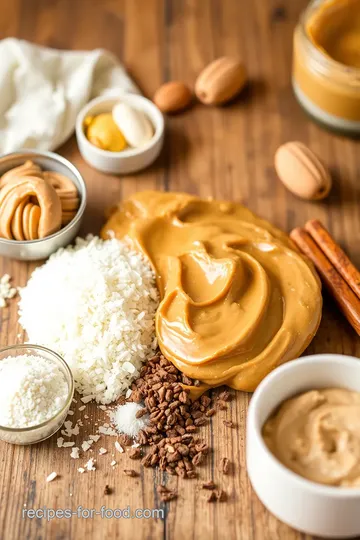
Now that you're pumped and raring to go, it’s time to gather your simple ingredients . grab your natural peanut butter, rolled oats, and your favorite protein powder.
You’ll also need some honey or maple syrup for that touch of sweetness. and if you're feeling adventurous, toss in some nuts or chocolate chips.
The best part? you probably already have most of this stuff in your pantry.
So why not grab your mixing bowl and a spatula? let’s get those no-bake protein bars made! trust me, your future self will thank you after those first few bites.
You’ll be living your best snack life soon enough.
Let’s move on to the goodies you’ll need to whip these up!
The Essential Ingredients Guide to No-Bake Protein Bars
Oh my gosh, friends, let’s talk ingredients! whether you’re whipping up easy peanut butter protein bars no-bake or other healthy snack recipes , having the right stuff on hand makes a world of difference.
Ready to dive into the savory sea of ingredients? let’s roll!
Premium Core Components
First things first, let’s get specific. Measurements matter, but don’t sweat it too much! For our protein bars, you’ll need 1 cup (240g) of natural peanut butter , and if you’re feeling adventurous, you could switch it up with almond or cashew butter! And how about ½ cup (120ml) honey or maple syrup for sweetness? Those sticky ingredients are like liquid gold, trust me!
Now, keep an eye out for quality indicators . you want your peanut butter without added sugar or oils. the fewer ingredients, the better.
And don't forget about storage guidelines —keep your bars in an airtight container in the fridge to satisfy your cravings for about a week.
For long-term storage? freeze ‘em for up to three months.
Freshness tips: Look for a nut butter that separates—you know the type! It’s a sign you got the good stuff. Plus, choose rolled oats that are gluten-free if that’s your jam!
Signature Seasoning Blend
Next up, we can’t forget about the signature seasoning blend that takes your bars to the next level! spice combinations can change the texture and flavor entirely.
Think about adding a dash of cinnamon or a pinch of sea salt for that sweet-and-salty combo.
Herbs are a bit of an acquired taste here, but a sprinkle of vanilla extract adds those delicious aromatics. And if you’re looking for regional variations, swap peanut butter with some vegan protein bars for a nut-free version!
Smart Substitutions
Okay, real talk here—sometimes life happens, and you’re out of certain ingredients. no worries! i’m all about those smart substitutions .
Instead of rolled oats, you can use the ever-reliable quick oats. trust me; no one will notice!
If you’re short on honey, maple syrup works just as well! planning on making these bars for kids’ healthy snacks? use maple for a kid-approved sweetness.
Or you can swap nuts out for seeds like pumpkin or sunflower seeds to make those bars allergy-friendly. quick energy bars for the win!
Kitchen Equipment Essentials
Before you dive into mixing, let’s chat about kitchen equipment essentials . you don’t need fancy gadgets here. just a mixing bowl and a rubber spatula or wooden spoon – bam, you're cooking! if you’re super simple, just a fork will do the trick! just mix it up until your heart’s content.
Must-have tools include an 8x8-inch baking dish lined with parchment paper. this makes the removal a breeze and prevents sticking—so don’t skip this step! if you're in an rv or a tiny apartment, you can use any flat dish as long as you adjust the thickness.
Tips on Preparation and Storage
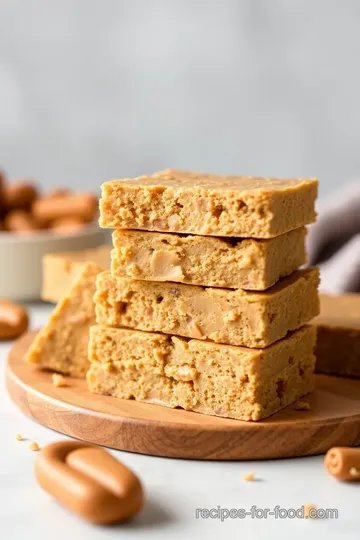
After you've whipped up your mix, press it down firmly in your prepared dish. seriously, don’t skip this—it makes for dense bars! if you prefer softer, chewy bars, let it chill for just 30 minutes.
Extra time in the fridge will make them firmer!
Feeling adventurous? Drizzle on some melted dark chocolate over the top before chilling for a sweet finish.
Storing these bars is easy too! just grab an airtight container, and they’ll hang out in the fridge for up to a week.
Whip them out after workouts, or toss one in your bag for a nutrient-packed treat whenever hunger strikes.
So, what do you think? Sounds like you’re ready to start cooking! Let’s dive into the step-by-step instructions to make these no-bake protein bars next! Your body—and taste buds—will thank you!
Mastering Professional Cooking: From Prep to Perfect Dishes
When it comes to professional cooking, the journey from average home cook to culinary whiz is all about preparation and technique.
Trust me, i’ve been there! i’ve burnt things, overcooked a steak, and even had disasters in the kitchen. but those experiences taught me valuable lessons.
Let’s dive into the essential preparation steps that make cooking easier and more fun!
Essential Preparation Steps
Mise en place matters
first things first: mise en place . it’s a fancy french term that just means “everything in its place.
” before you start, gather all your ingredients and tools. this way, when you’re chopping, stirring, or sautéing, you won’t be scrambling to find that pesky measuring cup.
Seriously, i've wasted precious minutes looking for stuff. don’t let that be you!
Time management tips
cooking can be chaotic if you're not careful. i like to set a timer for each step.
It gives me a gentle nudge to stay on track. for instance, if i’m whipping up some easy peanut butter protein bars no-bake , i’ll set a timer for the prep and another for chilling.
It keeps me focused!
Organization strategies
next, let’s talk about organization. i like to clean as i go—dirty dish? rinse it off. this not only keeps the workspace tidy but also helps prevent overwhelm.
But don’t wait until the end to tidy up; it’ll feel like you're running a marathon with weights.
Safety considerations
and please, safety first! keep a towel handy, and always have a fire extinguisher nearby. i once had a pan catch fire while i was cooking spaghetti.
Oh man, let’s just say it wasn’t my finest hour. always use caution when handling hot surfaces or sharp knives.
Step-by-Step Process
Alright, once you're prepped and ready, it’s time to cook. Here’s a simple breakdown for those peanut butter protein bars.
-
Prepare the Baking Dish
Line an 8x8-inch dish with parchment paper. This will make your life so much easier later. Trust me. -
Mix the Base
In a big-bowl, blend together 1 cup of peanut butter with ½ cup of honey until it’s smooth. No lumps allowed! -
Add Dry Ingredients
Stir in 1 ½ cups of rolled oats and 1 cup of protein powder . If you’re feeling wild, fold in some chopped nuts or chocolate chips . -
Form the Bars
Spread your mixture into the dish and press it down. This part is key! The firmer you press, the better your bars will hold together. -
Chill It
Pop that dish in the fridge for at least 30 minutes . It helps them firm up and makes cutting easier later. -
Cut and Serve
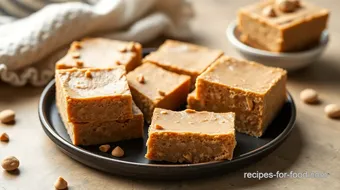
Once firm, cut 'em into squares. Enjoy your delicious, homemade protein bars!
Expert Techniques
Now, let's talk techniques! for perfect peanut butter bars, don’t skip the chilling step. it’s tempting, but cutting warm bars is a mess.
Also, if you add a pinch of salt to your mixture, it unlocks a whole new flavor dimension.
Success Strategies
Even the best cooks make mistakes. a common one is forgetting the proportions. make sure you measure your ingredients carefully, especially the peanut butter and oats, or your bars might turn out crumbly or too dense.
Also, don’t be afraid to experiment! Want a chocolate-flavored treat? Just mix in some cocoa powder. You can even swap peanut butter for almond butter to change things up.
And remember, store your bars in an airtight container to keep them fresh for a week. You can also freeze them for later, which honestly saves me during busy weeks!
Additional Information
Professional cooking is all about practice and learning from those little mishaps. remember, cook with love and passion—like you would while creating your favorite homemade protein bars.
Whether you're fueling up before a workout or whipping up some quick energy bars for the kids, these protein-packed treats are sure to please.
And who knows? you might just inspire someone else to get cooking, too!
Pro Tips & Secrets for Easy Peanut Butter Protein Bars No-Bake
Oh my gosh, if you’re looking to whip up some easy peanut butter protein bars no-bake , you’re in for a treat! i remember the first time i made these — it was a total game changer.
Seriously, it was like a light bulb went off. so, here are some pro tips and secrets i’ve gathered along the way.
Chef's Insider Insights
First things first, use room temperature peanut butter . This little trick makes mixing a breeze. If it’s too cold, good luck getting that creamy goodness to blend with the rest of your ingredients!
Time-Saving Techniques
You know those days when you need a snack and you need it now ? prepare these bars in just 15 minutes ! you literally throw everything together and just chill.
No cooking, no fuss! yes, please!
Flavor Enhancement Tips
Want to jazz it up? a pinch of salt can work wonders ! it really enhances the sweet flavors and takes your bars to the next level.
If you’re feeling adventurous, throw in some spices like cinnamon or nutmeg. oh, trust me, it’s a winner!
Perfect Presentation
So, once your Easy Peanut Butter Protein Bars No-Bake are all set and chilled, let’s talk presentation. Here are some cool plating techniques.
Plating Techniques
I like to use a clean white plate to really make them pop. You can also layer them up with some sliced bananas or a sprig of mint on the side — just to make it fancy, you know?
Garnish Ideas
Drizzling some melted dark chocolate on top or sprinkling some chopped nuts can really elevate them. Visual appeal is everything , especially when you’re sharing with friends or just treating yourself!
Color Combinations
If you use colorful toppings like dried cranberries or vibrant nuts, it’ll transform your bars into an eye-catching snack. We eat with our eyes first, right?
Storage & Make-Ahead
Now, let’s be real. Life can get busy, so knowing how to store these bars is key.
Storage Guidelines
Keep your bars in an airtight container in the fridge. They can last about a week...but let’s be honest, they probably won’t last that long!
Preservation Methods
Want them to last longer? you can freeze them! just wrap each bar in plastic wrap and store them in a resealable freezer bag.
They’ll be good for up to three months. it’s like having your own stockpile of nut butter snacks !
Reheating Instructions
No need to reheat these beauties since they’re no-bake . Just grab and go!
Freshness Duration
But if they start to smell off or feel weird, toss them. Always trust your senses!
Creative Variations
This is where the fun begins! One of the best things about these bars is how versatile they are.
Flavor Adaptations
You can switch the peanut butter for almond or even sun butter. Seriously, mix it up! You can have a different flavor every time you make them.
Dietary Modifications
Need them to be vegan? Just swap honey for maple syrup. Easy-peasy!
Seasonal Twists
In the fall, consider adding pumpkin spice or in the summer, toss in some dried fruit like apricots!
Regional Variations
Feeling fancy? Create a S’mores version by adding some crushed graham crackers and mini marshmallows. It’s like a party in your mouth!
Complete Nutrition Guide
Don’t worry, I got you! Here’s the lowdown on what’s actually in those nutritional bars .
Detailed Breakdown
One of these bars will give you about 7g of protein . Perfect for a post-workout snack or a quick breakfast on the go.
Health Benefits
These bars are loaded with fiber and nutrients from oats and nuts. They’re a satisfying and healthy option that’s low in sugar.
Dietary Considerations
They’re gluten-free if you use certified oats. Bonus!
Portion Guidance
One bar is a serving, but honestly, who can stop at just one?
Expert FAQ Solutions
Got questions? I’ve been there!
Common Questions
“Will these bars crumble?” If you press them firmly into the pan, you’re golden!
Troubleshooting Guide
If they seem too dry, add a touch more peanut butter or honey.
Success Tips
Always let them chill longer than you think – this helps them firm up nicely!
Variations Explained
You can easily swap ingredients based on what you have at home. Just keep the ratios similar.
Okay, my friend, now that you’ve got all this additional recipe information in your pocket, you should feel empowered! honestly, these easy peanut butter protein bars no-bake are just waiting for you to get creative with them.
Don’t be shy; have fun in the kitchen and enjoy your delicious, nutritious homemade treats ! you got this!

Easy Peanut Butter Protein Bars No-Bake Card
⚖️ Ingredients:
- 1 cup natural peanut butter (smooth or crunchy)
- ½ cup honey or maple syrup
- 1 ½ cups rolled oats (gluten-free, if desired)
- 1 cup protein powder (vanilla or chocolate)
- ½ cup chopped nuts (optional, e.g., almonds, walnuts)
- ½ cup chocolate chips or dried fruit (optional)
- ¼ cup melted dark chocolate or yogurt coating (optional)
🥄 Instructions:
- Step 1: Line the 8x8-inch baking dish with parchment paper, leaving an overhang for easy removal.
- Step 2: In a mixing bowl, combine the peanut butter and honey/maple syrup, mixing until smooth.
- Step 3: Gradually stir in the rolled oats and protein powder until evenly distributed, then fold in nuts and chocolate/dried fruit if using.
- Step 4: Transfer the mixture to the prepared baking dish and press down firmly with a spatula to create an even layer.
- Step 5: Place the dish in the refrigerator for at least 30 minutes to firm up.
- Step 6: If using, melt the dark chocolate and drizzle over the chilled bars.
- Step 7: Lift the bars out using the parchment paper overhang and cut into squares or rectangles.
Previous Recipe: How to Make a Delicious Cooked Whole Wheat Healthy Beverage
Next Recipe: Easy Whisked Dressing with Garlic and Parmesan: A Delicious Secret!