Quick and Easy Bisquick Apple Cobbler
Wondering how to make a Bisquick apple cobbler? This comforting, homemade dessert is super easy and full of deliciously spiced apples. Pair with ice cream!

Quick and Easy Bisquick Apple Cobbler: A Comforting Dessert Delight
Oh my gosh, have you ever had one of those fall days where you just want to pull out all the cozy vibes? i remember one afternoon when the air was crisp, the leaves were crunching underfoot, and i could practically smell autumn in the air.
I decided to whip up a bisquick apple cobbler that had been whispering sweet nothings to me. honestly, it felt like a warm hug in a bowl.
This recipe is not just any dessert; it’s the kind of comfort food dessert you can’t help but dive into, especially when it’s topped with a generous scoop of ice cream.
The Story Behind This Delicious Dish
So, if you’re wondering what's the deal with this cobbler? well, cobblers have been around for ages, originating in the american south.
Back in the day, when apples were plentiful, folks would slice them up, sprinkle some sugar, and top ‘em with something fluffy.
Fast forward a few decades, and here we are, using good ol' bisquick for that fluffy topping. it’s become one of those easy baking recipes you can whip up without breaking a sweat.
I’m tellin’ ya, once you taste it, you’ll understand why this recipe is so loved today!
Now, here’s the kicker: it takes about 50 minutes total from start to finish, and it’s super easy to make.
Seriously, if you’ve ever been intimidated by baking, don’t sweat it. this is rated as easy , making it perfect for beginners or anyone who just wants a quick dessert fix!
Budget-Friendly Comfort
Now, let’s chat about money. this recipe is light on the wallet too. you’ll easily make eight hearty servings for under twenty bucks, depending on current apple prices.
You’ve got yourself a dessert for a crowd without spending a pretty penny! plus, who doesn’t love a warm apple dessert that’s made with love?
Why You'll Love This Bisquick Apple Cobbler
Why should you try making this cobbler, you ask? well, first off, let’s talk health benefits . sure, it’s a treat, but apples are packed with fiber and vitamin c.
They’re low in calories and can bring a little sweetness to your day without the guilt factor—for a dessert, anyway!
Then, there’s the nostalgia factor. think about how many warm apple desserts you’ve enjoyed as a kid. this one takes you right back! it’s perfect for fall dessert recipes or even as a quick weeknight treat.
The flavors are comforting, and honestly, who can resist a delicious warm dessert , especially with some vanilla ice cream to escort it?
It’s even more delightful because you can play with it! want to add some berries for a fun twist? go for it! of course, that leads to the best part of all: those sweet apple recipes just got a touch sweeter.
Sure, you have apple crisps and cobblers, but this version is a total winner. and don’t get me started on how good it tastes with some whipped cream on top.
That combo? chef’s kiss!
Let’s look into Into Ingredients
Here’s where the magic happens, folks. we’re taking simple ingredients and turning them into something really special. apples, sugar, flour.
.. you get the drill. so, are you ready to grab your apron? let’s talk about what you’ll need to make this delightful bisquick cobbler recipe .
I promise it’ll be a hit at your dinner table!
And just like that, you’ll be on your way to creating an unforgettable dessert. Keep your eyes peeled for the ingredient list—I can’t wait for you to taste this cobbler wonder and join the ranks of those who just can't get enough of this classic American dessert!
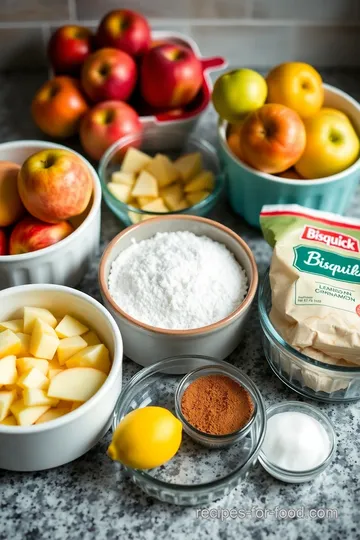
Essential Ingredients Guide for Your Bisquick Apple Cobbler
When it comes to whipping up a quick and easy dessert like bisquick apple cobbler , knowing your ingredients is key.
Let’s dive into this essential ingredients guide to help you make the most out of this delicious apple dessert recipe!
Premium Core Components
First off, let’s talk about some serious premium core components that you’ll need:
-
Apples: aim for 4 medium apples , preferably granny smith or honeycrisp —these bad boys have just the right balance of sweetness and tartness.
That’s about 4 cups or 600 grams . it’s all about that flavor kick!
-
Sugar: You’ll want 1/2 cup (or 100g ) of granulated sugar to sweeten your filling. Honestly, who doesn’t love a bit of sweetness in a dessert?
-
Cinnamon: A classic spice! Use 1 teaspoon to give your cobbler that cozy, fall vibe.
Storage tips: store your apples in a cool, dry place. they last about a week or two on the counter, but pop them in the fridge if you want them to stay fresh longer.
Signature Seasoning Blend
Now, speaking of that signature seasoning blend :
- Cinnamon is a must-have. But hey, feel free to throw in a pinch of nutmeg or a dash of allspice if you’re feeling adventurous.
- Lemon juice will help brighten the apples. Just 1 tablespoon does the trick.
Honestly, playing around with herbs and spices can turn this basic cobbler into something special. Ever heard of addin' a sprig of fresh thyme or rosemary? I know, mind-blowing!
Smart Substitutions
Life happens, and sometimes we just don’t have all the ingredients on hand. Here are some smart substitutions to save your cobbler:
-
Butter: If you’re out of unsalted butter, margarine works just fine. You could even use coconut oil for a unique twist!
-
Milk: Can't do dairy? Substitute with almond milk or oat milk. Your cobbler won’t know the difference.
-
Apples: Swap those apples for fresh peaches, or even throw in some mixed berries for a fruity adventure. The cobbler will adapt; trust me!
Kitchen Equipment Essentials
Before you dive into creating your masterpiece, you’ll need some essential kitchen tools:
-
9x13 inch baking dish: For that perfect baking surface—trust me, it makes a difference!
-
Mixing bowls and measuring cups: Precision helps! We’re aiming for a delicious cobbler, not a science experiment.
-
Peeler and knife: For peeling those apples like a pro.
Prep tip: Always keep a clean workspace! It’ll help you feel less chaotic and more organized while baking, especially when you want to serve warm desserts to the fam.
Cooking Tips for Novices
Now, if you’re new at this baking gig, here are a few simple tips to keep you on track:
-
Don’t Overmix: When making that fluffy biscuit topping, stir until just combined. Overmixing can lead to tough cobbler. Nobody wants that!
-
Cool and Serve: Once baked, let it cool slightly before serving. Serve it warm with vanilla ice cream or a dollop of whipped cream . It's the ultimate comfort food dessert.
And there you have it! now that you’ve got your ingredients and tips lined up, let’s move on to the recipes.
Gather those apples and let’s make that quick apple cobbler together! seriously, your friends and family will come running for a taste of this warm, sweet apple goodness.
So, are you ready to bake? 🍏✨
Mastering the Art of Professional Cooking: Your Go-To Guide
Let’s dive into the world of professional cooking methods ! cooking can feel overwhelming, but with a few essential techniques, you can whip up delicious meals like a pro.
Whether you’re serving up a bisquick apple cobbler or a fancy dinner, this guide covers everything you need for success.
Essential Preparation Steps
Mise en place —it's not just a fancy term! it means "everything in its place." before you even think about heating up your oven, gather all your ingredients and tools.
Chop those apples for your cobbler, measure out your sugar, and grab your mixing bowls. when your kitchen is organized, cooking becomes a breeze.
Time management is also key. make a plan! know how long each step takes. prepping your ingredients can save you time.
For example, if you’re making that cobbler, peel and slice your apples ahead of time while the oven preheats to 350° f ( 175° c) .
Don’t forget about safety considerations . Keep your workspace tidy! A cluttered area can lead to accidents. Always be cautious with sharp knives and hot surfaces.
Step-by-Step Process
Ready to get cooking? Here’s a clear breakdown of how to make your star dessert, starting with our Bisquick apple cobbler !
-
Preheat your oven : Got that oven set to 350° F ( 175° C) ? Good!
-
Prepare your apple filling : Toss those sliced apples in sugar and cinnamon. Spread them evenly in your baking dish.
-
Create the biscuit topping : Mix your Bisquick , sugar, milk, melted butter, and vanilla. Don’t overmix; you want it fluffy!
-
Assemble the dish : Pour that batter over your apples. It’s okay if it’s not perfect. Rustic is the way to go for this comfort food dessert!
-
Bake it : Pop your cobbler in the oven for 30– 35 minutes . Keep an eye out! The topping should turn golden brown, and a toothpick should come out clean.
Expert Techniques
Now, let’s talk about some expert techniques that’ll elevate your cooking:
-
Quality checkpoints : As you cook, taste! Adjust the sweetness, and think about texture. Your cobbler should be bursting with flavor.
-
Troubleshooting tips : If your topping isn’t browning, increase the temperature to 375° F ( 190° C) for the last few minutes, but watch it closely!
Success Strategies
Let’s avoid common mistakes. First up, don’t skip the quality assurance step. Always taste your filling! If it’s too tart, a little extra sugar can go a long way.
Lastly, if you're pressed for time, consider make-ahead options . you can prep the filling and topping earlier in the day, then bake when you're ready to serve.
This shortcut makes it perfect for family-friendly desserts or gatherings!
Things to Keep in Mind
When it comes to cooking tips for novices , remember to have fun! cooking is all about experimenting. if you feel like adding a twist with a touch of nutmeg in the filling, go for it! it’s your dish.
Want to impress? Serve your cobbler warm, topped with a scoop of vanilla ice cream or a dollop of freshly whipped cream. That combination? Total magic!
Wrapping It Up
So there you have it! a step-by-step guide to making your own bisquick apple cobbler and some pro tips to ensure it’s a hit.
Don't be afraid to dive in and make it your own.
In our last section, we’ll explore some additional information on dessert variations, what to pair with your cobbler, and more! from baking tips to seasonal fruit ideas, we’ve got you covered.
Let’s keep the good times rolling with easy recipes that warm your heart!
Whipping Up Your Perfect Bisquick Apple Cobbler: Tips and Tricks
Oh my gosh, if there’s one dessert that’ll warm your heart and belly, it’s bisquick apple cobbler . seriously, the combo of warm, spiced apples under a fluffy, golden topping is like a hug in a dish.
But before you dive in, let’s chat about some pro tips , storage guidelines , and fun variations to make your cobbler even better!
Pro Tips & Secrets
When I first tackled my Bisquick cobbler recipe, I learned a thing or two along the way. Here’s the scoop:
-
Apple Selection is Key : Use a mix of sweet and tart apples like Granny Smith and Honeycrisp . This balance gives your cobbler depth in flavor.
-
Timing is everything : you’re gonna want to prep that filling quick and pop it in the oven fast. the longer apples sit with sugar, the more juice they release.
And trust me, no one wants soupy cobbler!
-
Quick mixing : when you mix your topping of bisquick, milk, and butter , just blend until combined. overmixing can make it tough.
Nobody wants a dense biscuit on top of their sweet apple dessert, right?
-
Experiment with Spices : A touch of nutmeg or a sprinkle of allspice can elevate your dish to “wow” status. Seriously, a little spice never hurt anyone!
Perfect Presentation
Now, I’m all about that Instagram aesthetic when it comes to food. Here’s how you can make your cobbler shine:
-
Plating Techniques : A simple scoop on a white plate can make those vibrant apples pop. Use a wide, shallow bowl to show off those golden toppings.
-
Garnish Like a Pro : Dust with powdered sugar or add a sprig of mint for color. A scoop of vanilla ice cream melting over the top? Yes, please!
-
Color Combinations : Don’t just think apples. Mixing in berries can give visual contrast, plus you get to brag about your easy fruit cobbler skills.
Storage & Make-Ahead
Let’s face it, life gets busy. Here are some storage tips for your delectable dessert:
-
Storage Guidelines : Store your leftover cobbler in the fridge, covered with foil or plastic wrap, and it’ll hang tight for about 3-4 days.
-
Preservation Methods : You can freeze your homemade cobbler filling separately! Just pop it in a freezer-safe bag or container, and it’ll freeze well for 3 months.
-
Reheating Wonder : Reheat in the oven at 350° F for about 15- 20 minutes. Or, if you’re in a hurry, zap it in the microwave for 1- 2 minutes.
Creative Variations
One of the best things about apple recipes with Bisquick is how open they are to customization:
-
Flavor Adaptations : Mix in some cinnamon applesauce for an extra flavor kick, or use pears for a change.
-
Dietary Modifications : Want to keep it gluten-free? Grab some gluten-free Bisquick, and you’re all set.
-
Seasonal Twists : Swap out apples for fresh peaches in summer or toss in a handful of pumpkin spice in fall for a cozy vibe.
Complete Nutrition Guide
Alright, if you’re wondering about the health side of things, let’s break it down simply:
-
Calories : About 280 per serving. That’s pretty reasonable for such a comfort food dessert .
-
Health Benefits : Apples are high in fiber and vitamins, so think of this as a semi-healthy treat!
-
Portion Guidance : I usually suggest one serving, but if you’re feeling generous, go ahead and share!
Expert FAQ Solutions
And you thought you had all your bases covered! Here’s a few FAQs I come across:
-
Why is my topping soggy? If you let it sit too long, the juices from the apples will puddle. Get that cobbler in the oven pronto!
-
How can I make it less sweet? Just reduce the amount of sugar in both the filling and topping.
Feeling pumped to make this great dessert? embrace the flavors of fall with your bisquick apple cobbler . it’s all about experimenting, so don’t sweat the small stuff.
Baking should be fun! grab those apples, turn on some tunes, and let’s get to baking. you've got this!
Quick and Easy Bisquick Apple Cobbler Card
⚖️ Ingredients:
- 4 medium apples, peeled, cored, and sliced (about 4 cups or 600g)
- 1/2 cup granulated sugar (100g)
- 1 teaspoon ground cinnamon
- 1 tablespoon lemon juice
- 2 cups Bisquick mix (240g)
- 1/2 cup granulated sugar (100g)
- 1 cup milk (240ml)
- 1/3 cup unsalted butter, melted (75g)
- 1 teaspoon vanilla extract
🥄 Instructions:
- Step 1: Preheat your oven to 350°F (175°C).
- Step 2: In a large bowl, combine sliced apples, sugar, cinnamon, and lemon juice. Toss until apples are well-coated. Spread the apple mixture evenly in the bottom of the baking dish.
- Step 3: In a separate bowl, whisk together Bisquick mix and sugar. Add milk, melted butter, and vanilla extract. Stir until just combined (do not overmix).
- Step 4: Pour the biscuit topping over the apple filling, spreading it evenly.
- Step 5: Bake in the preheated oven for 30-35 minutes or until the topping is golden brown and a toothpick inserted into the topping comes out clean.
- Step 6: Let cool slightly before serving. Optional: Serve warm with vanilla ice cream or whipped cream.
Previous Recipe: My Grandmother's Tropical Chicken Delight: Explore Pollo Tropical Calories
Next Recipe: Ultimate Grilled Herb Chicken Skewers: Delicious Cookout Nutrition Info