Easy Homemade Pizza Dough with a Food Processor
Wondering how to make pizza dough with a food processor? This easy, tested recipe helped me create delicious, chewy crusts for family pizza night!

- Let’s Talk Pizza Dough!
- A Quick Look at the Dough
- Why You’ll Love This Recipe
- Time to look into In!
- Get Your Pantry Game On: Essential Ingredient Guide
- Perfectly Easy Pizza Dough: Made in a Food Processor
- Tips & Tricks from the Pros
- Making Your Pizza Shine: Presentation Tips
- Storage & Meal Prep Magic
- Fun Variations
- Nutrition Nuggets
- Got Questions? We’ve Got Answers!
- Recipe Card
Let’s Talk Pizza Dough!
Oh my gosh, i remember the first time i tried to make pizza dough. i was in college, craving a slice of homemade goodness, and i decided it would be so easy.
Spoiler alert: it was a disaster. i ended up with a glob of floury goo that wasn't fit for human consumption.
But hey, we learn by failing, right? fast forward a few years, and now i know how to make pizza dough with a food processor —and trust me, it's a game changer!
Imagine the smell of fresh pizza filling your kitchen. that crispy crust with just the right amount of chewiness? honestly, there's nothing like it.
So grab your food processor, and let’s make this dough together!
A Quick Look at the Dough
Did you know that pizza dough has roots in italy, dating back centuries? yup! it’s not just a modern food trend; it's part of a rich culinary history.
Nowadays, making your own homemade pizza dough is as popular as that pizza joint down the street that everyone talks about.
And let me tell you, this recipe is super easy and perfect for any skill level.
Oh, and the best part? it takes only about 15 minutes of active time. with a little rest (we're talking around 30 to 45 minutes ), you'll be ready to whip up two 12-inch pizzas.
Now, who doesn’t love that? not to mention, it’s budget-friendly. with just a few ingredients, you can make enough dough that’ll satisfy your pizza cravings without breaking the bank!
Why You’ll Love This Recipe
Listen up, because there are a ton of reasons why this pizza dough is a winner. first off, let’s talk health.
This dough is a blank canvas, so you can control what goes into it. don't like certain additives? just skip 'em! plus, you get the bonus of knowing exactly what’s in your food.
Nice, right?
And if you’re wondering when to serve it, this dough is perfect for homemade pizza night . want to impress your pals during the next football game? or maybe a cozy date night at home? either way, this dough is sure to wow your guests.
You can even throw in some herbs for pizza dough or experiment with toppings to change things up!
Plus, using a food processor for dough makes it quick —no more elbow grease or workout required! want a fun family night? get the kids involved; it’s an easy way for them to learn simple pizza dough methods and make their own creations.
The only arm workout you’ll need is stirring the sauce!
Time to look into In!
If you're ready to head to the kitchen, we need to go over some key ingredients. for this dough, you really don't need a lot.
Just some all-purpose flour, active dry yeast (we’ll get into yeast activation tips later), salt, olive oil, and warm water.
Remember, it's all about getting the right dough consistency guidelines so your crust turns out perfectly every time.
But before we get into the nitty-gritty of the ingredients, keep in mind: resting the dough is key. this doesn’t just give you time to binge-watch your favorite show—it's crucial for developing your dough's flavor and texture.
So, grab a bowl, cover it up, and let that dough rest while you find the perfect classic pizza topping ideas .
Ready to make a pizza that’ll knock your socks off? let’s get those ingredients together and roll out that perfectly easy pizza dough .
Trust me, you'll be the queen or king of pizza night in no time!
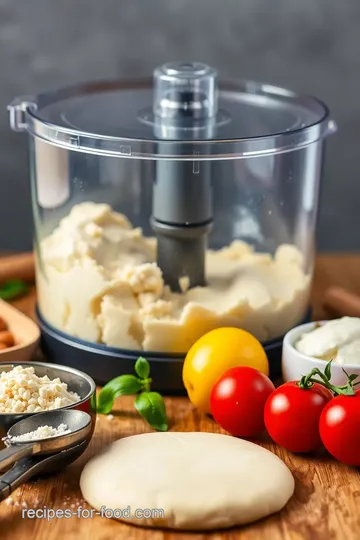
Get Your Pantry Game On: Essential Ingredient Guide
Oh my gosh, let’s dive into the yummiest part of cooking: the ingredients! whether you’re all about homemade pizza dough or just need a touch of flavor in your dinner, knowing your way around key ingredients is a must.
This guide's got you covered, so you can pick what’s best for your kitchen escapades.
Premium Core Components
To whip up that perfectly easy pizza dough , having the right ingredients is kinda like having a great playlist—it's essential! Here’s a quick peek at what you need:
- 2 ½ cups all-purpose flour (320g): The star of the show! Look for flour that's soft and finely milled. (Pro tip: The best flour for pizza dough often comes labeled as “baker’s flour” or “00 flour.” It really amps up that chewiness!)
- Active dry yeast (1 teaspoon or 3g): Make sure it's fresh! If the expiration date is just around the corner, it might lose its kick. Activated yeast can make or break your dough’s puffy dreams!
- Salt (1 teaspoon or 6g): It’s more than flavor—salt strengthens the dough structure. Trust me, your tastebuds will thank you!
- Olive oil (1 tablespoon or 15ml): This little gem adds flavor and helps with that crispy crust you’re after.
- Warm water (¾ cup at 110° F/ 43° C or 180ml): The right temp is key! Too hot? You’ll toast the yeast. Too cold? Well, it won’t rise.
Storage Guide: Keep your flour in a cool, dry place. Yeast should hang in the fridge for freshness. Olive oil can go in the pantry, but don't let it hang around for too long—check the expiration!
Signature Seasoning Blend
Now, let’s jazz things up with some flavor! You can turn that simple pizza dough into a next-level creation. Here’s how:
- Essential Spice Combos: Go for garlic powder, red pepper flakes, or even a pinch of oregano mixed in your dough. Not too shabby, right?
- Herb Selections: Herbs for pizza dough can add a dash of something special. Rosemary or basil work wonders.
- Flavor Enhancers: Think about adding a splash of balsamic vinegar or some cheese into the mix for a pop of flavor.
Smart Substitutions
Guess what? Cooking isn’t always about exact measurements, and that’s totally cool. Things happen, and substitutions can save the day:
- Olive Oil: Can’t find olive oil? No worries! Vegetable oil will do just fine.
- Flour Type: If you’re feeling adventurous, sub in half whole wheat flour for a nutty twist or use a gluten-free blend.
- Emergency Replacements: That yeast can be tricky, but if you’re in a bind, baking powder can work in a pinch—just don’t expect the same rise!
Kitchen Equipment Essentials
Now let’s talk tools because you can't make magic without the right gadgets. Here’s the lowdown on must-have tools:
- Food Processor: Seriously, if you're on the path to mastering how to make pizza dough , a food processor is where the magic happens. It saves you time and gives a great dough consistency.
- Plastic Wrap/ Damp Towel: Keeping that dough covered while it rises is key for a good dough resting time .
- Measuring Tools: Accurate measurements are non-negotiable! It’s like following a road map to flavor town.
Wrap-Up for Pizza Night Bliss
So there ya go! with a handful of quality ingredients and some fun tips, you’re absolutely ready to make pizza dough with a food processor .
This guide should help you confidently tackle your next homemade pizza night. and let’s not forget, experimenting with pizza dough variations can give you endless fun in the kitchen.
Get your apron on and let’s hit the dough-making journey! next up, i’ll share how to put all these ingredients together to create the perfect base for a classic margherita or an extravagant veggie delight.
Happy baking!
Perfectly Easy Pizza Dough: Made in a Food Processor
Oh my gosh, let’s talk pizza! who doesn’t love a warm, cheesy slice straight outta the oven? making your own homemade pizza dough can sound intimidating, but trust me, it doesn’t have to be.
With this easy-peasy pizza dough recipe, you’ll learn how to make pizza dough like a pro—using a food processor, no less! seriously, it’s a total game changer for pizza night.
The Magic of Preparation: Getting it Right
Alright, let’s kick things off with some essential prep steps. if you wanna crush it in the kitchen, mise en place is your best buddy.
"mise en place" just means having everything ready before you start cooking. it's like laying your cards out on the table! measure out your 2 ½ cups of all-purpose flour , 1 teaspoon of active dry yeast , and 1 teaspoon of salt before turning on the food processor.
This’ll save you from scrambling later on when you’re knee-deep in dough.
Time management is also key. you’re looking at about 15 minutes of active prep time . make sure to give yourself an hour total for resting, to let that dough do its thing and rise up like it’s auditioning for a baking show.
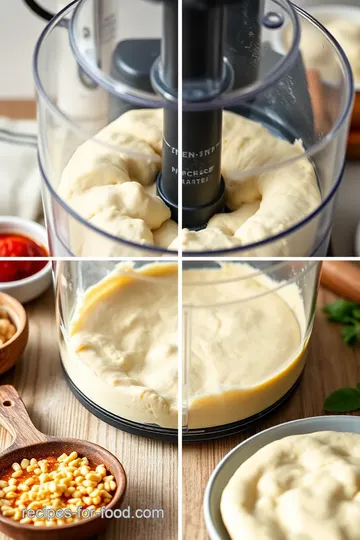
Step-by-Step Process: Making Dough Like a Boss
Now for the fun part—the step-by-step breakdown!
-
Prepare Ingredients: First, gather all your ingredients. Lay them out and take a moment to appreciate the simplicity!
-
Combine Dry Ingredients: Toss the flour, yeast, and salt into your food processor. Pulse that baby until it’s nicely combined.
-
Add Wet Ingredients: While the processor is running, slowly pour in ¾ cup of warm water (around 110° F/ 43° C ) and 1 tablespoon of olive oil .
-
Mix the Dough: Process until a dough ball forms, about 1 minute . If things feel a bit sticky, don’t sweat it! That’s perfect.
-
Resting time: now, here’s where the magic happens—take that dough, form it into a ball, and let it rest in a lightly oiled bowl.
Cover it with plastic wrap or a damp towel and let it rise for 30- 45 minutes until it doubles in size.
You’ll know it’s ready when it feels ever-so-slightly tacky but not sticky.
Expert Techniques: Taking it Up a Notch
For expert results, let’s dive into some pro tips. Make sure you read through them!
-
Check Dough Consistency: When you punch down your dough after resting, ensure it’s soft and pliable. You want a windowpane effect—where you can stretch a small piece of dough without it tearing.
-
Quality Checkpoints: If you’ve used fresh yeast, it should be bubbly and frothy. That’s your green light to bake it up!
-
Temperature control: when baking your pizza, heat that oven to 475° f ( 245° c) , and let it preheat for at least 30 minutes if you’re using a pizza stone.
If you're just using a regular pan, still preheat—this helps get that crispy pizza crust you dream about.
Success Strategies: Don’t Mess it Up!
Nobody wants to end up with a tough, rock-hard pizza crust. Here’s what to avoid:
-
Don’t Overmix: A quick mix is enough. Overworking the dough can lead to toughness, and we don’t want that, do we?
-
Resting is Everything: Use that dough resting time to whip up some toppings! A quick marinara sauce or sautéed bell peppers can make all the difference.
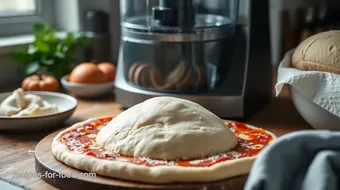
So now you've got your dough ready! you can roll it out and create any pizza you love. i like to keep it classic with mozzarella and basil or go wild with pepperoni and olives.
Final Thoughts: Your Homemade Pizza Adventure Awaits
Hope you’re stoked to make that dough! making pizza at home is not just delicious; it becomes a fun experience with friends or family.
Whether it’s a cozy movie night or a pizza party, having homemade pizza dough at your fingertips opens up a world of culinary possibilities.
Next up, I’m gonna dive into Additional Information about different dough variations and quick tips to elevate your pizza game! You don’t wanna miss out on that—stay tuned!
Tips & Tricks from the Pros
Oh my gosh, making pizza at home is such a joy! you know what makes it even better? using a food processor to whip up that crispy pizza crust in no time! here are some pro tips to level up your game.
- Water Temperature Matters: Make sure your water is warm, not boiling. You want that yeast to wake up—not get fried! Aim for about 110° F ( 43° C).
- Don’t Overmix: Seriously, over-mixing can ruin your dough. Just blend it until it comes together into a nice ball—about a minute or so. You don’t want tough dough; you want chewy goodness!
- Resting is Key: Once you finish mixing, give your dough a breather. A good dough resting time of 30- 45 minutes helps develop flavor and gives the gluten a chance to relax.
- Don’t Skip Preheating: Preheat your oven for at least 30 minutes before baking. This helps create that crispy crust we all crave!
- Experiment With Flour: Switching flours can change things up! Try bread flour for that extra chewiness or whole wheat for a nutritious twist. Who knew there were so many ways to play with a simple pizza dough method ?
Making Your Pizza Shine: Presentation Tips
Let’s chat about making your homemade pizza look as good as it tastes. Remember, we eat with our eyes first! Here’s how to plate like a pro:
- Plating Techniques: Slice your pizza into wedges, and don’t be shy—fancy plates always get some oohs and aahs. A wooden cutting board gives it that rustic vibe, too!
- Garnish Ideas: A sprinkle of fresh basil or a drizzle of olive oil post-baking will elevate the look. Maybe even some chili flakes if you’re feeling spicy!
- Color Combinations: Think about color—vibrant veggies like bell peppers or red onions can make your pizza visuals pop. Green herbs add freshness—like a little burst of summer!
- Visual Appeal Tips: Arrange toppings layer by layer rather than dumping them all in one spot. Looks are everything, right?
Storage & Meal Prep Magic
Planning to make-ahead? You’ll be a pizza superhero in no time! Here’s how to store and prep like a pro.
- Storage Guidelines: After letting that dough rise, you can pop it in the fridge for up to 2 days. Wrap it like a burrito in plastic wrap to keep it fresh.
- Preservation Methods: If you’re feeling ambitious, freeze your dough for up to 3 months! Just thaw it in the fridge overnight before using.
- Reheating Instructions: To revive leftover pizza, toss it in a hot oven (around 375° F or 190° C) for about 10 minutes. It’ll be almost like new!
- Freshness Duration: Once baked, pizza is best enjoyed fresh, but it’ll keep in the fridge for 3-4 days. Just steam it back to life in the oven, and you’re golden!
Fun Variations
Now, let’s mix it up! Once you’ve mastered how to make pizza dough, why stop there? Try these fun twists:
- Flavor Adaptations: Think of adding herbs for pizza dough like rosemary or thyme. Instant flavor boost!
- Dietary Modifications: Want gluten-free? Use a gluten-free pizza crust mix, and voilà! You don’t have to miss out anymore.
- Seasonal Twists: Top your dough with seasonal veggies, like butternut squash in fall or fresh tomatoes in summer.
- Regional Variations: look into into different styles! How about a Detroit-style deep dish or a classic Italian pizza? The world is your pizza oyster!
Nutrition Nuggets
Wanna know what’s in that beautiful pizza? Here’s a quick breakdown of the good stuff:
- Calories: About 120 per serving
- Protein: 3g
- Fat: 2g
- Carbs: 23g
With that in mind, keep your portions in mind. If you’re sharing at a homemade pizza night , it’s fine to be generous but mindful of those calories!
Got Questions? We’ve Got Answers!
I know you’re probably wondering—what if my dough doesn’t rise, or my crust turns out too chewy? Here are some tips to set you straight:
- Common Questions: If your dough doesn’t rise, it could mean your yeast was dead. Always check the expiration date!
- Troubleshooting Guide: Dough too sticky? Add a little flour, but don’t overdo it. You want that perfect dough consistency !
- Success Tips: Let it rest! Plenty of pizza dough rising time helps build up that strength.
- Variations Explained: Remember, you can always adjust ratios to achieve that dream crust!
Let me just say this: making your own pizza dough is not just a cooking task; it's an experience. so roll up your sleeves and crank up the music.
You’re about to have the best homemade pizza night ever!

Easy Homemade Pizza Dough with a Food Processor Card
⚖️ Ingredients:
- 2 ½ cups all-purpose flour (320g)
- 1 teaspoon active dry yeast (3g)
- 1 teaspoon salt (6g)
- 1 tablespoon olive oil (15ml)
- ¾ cup warm water (110°F/43°C) (180ml)
🥄 Instructions:
- Step 1: Measure and gather all ingredients.
- Step 2: In the food processor, pulse together flour, yeast, and salt until combined.
- Step 3: With the processor running, gradually pour in warm water and olive oil.
- Step 4: Process until the dough forms a cohesive ball, about 1 minute. It should be slightly sticky.
- Step 5: If a more elastic dough is desired, remove from machine and knead by hand for 2-3 minutes.
- Step 6: Form into a ball and place in a lightly oiled bowl. Cover with plastic wrap or a damp towel. Let it rest for 30-45 minutes until doubled in size.
- Step 7: Once rested, punch down the dough and divide it in half. Shape each half into individual pizza bases.
Previous Recipe: Delicious Quick Tofu Sofritas Flavorful Vegan Bowl: 5 Easy Steps!
Next Recipe: How to Bake Fudgy Brownies - Refined Sugar-Free: My Secret Recipe!