Cook Brown Butter Ghee: Rich & Nutty
Ever wondered how to cook brown butter ghee? This easy recipe transforms simple butter into a rich, nutty staple that elevates your dishes. Let's get cooking!

- look into into the Deliciousness of Brown Butter Ghee
- Recipe Overview
- Key Benefits
- From the Kitchen to Your Table
- Essential Ingredients Guide
- Mastering the Art of Brown Butter Ghee
- Pro Tips & Secrets
- Perfect Presentation
- Storage & Make-Ahead
- Creative Variations
- Complete Nutrition Guide
- Wrap-Up
- Frequently Asked Questions
- Recipe Card
look into into the Deliciousness of Brown Butter Ghee
Let me take you back to one chilly saturday afternoon when the aroma of butter melting on the stovetop filled my kitchen.
Honestly, there’s something magical about cooked butter. it’s almost as if the smell wraps around you like a warm hug.
That day, i set out to uncover the secret behind the nutty, rich enchantment of cook brown butter ghee: rich & nutty .
I mean, who wouldn’t want to add that depth of flavor to their meals?
So, what exactly is ghee? simply put, it’s clarified butter that’s been simmered until it reaches a deep golden hue and enhances its nutty flavor.
Think of it as your kitchen sidekick that makes every dish sing. it’s a staple in indian cooking and a favorite for dairy-free cooking , making it accessible to many of us who love to experiment in the kitchen.
Recipe Overview
The origins of ghee go way back in time, tracing back to ancient india. it was traditionally used in various ceremonies and has been a go-to fat for generations.
Nowadays, ghee has exploded in popularity thanks to its high smoke point oil that makes it perfect for sautéing and frying.
And with more folks shifting towards healthier options, ghee offers some serious ghee benefits .
What’s great about this particular recipe? it’s surprisingly easy. you only need about 20- 25 minutes total and minimal ingredients—just butter (and maybe a pinch of salt, if you’re feeling fancy).
On the budget front, it won’t break the bank either. one cup of this liquid gold can take your home cooking from “meh” to “whoa!” without emptying your wallet.
Key Benefits
Now, let’s talk health for a sec. ghee is a great source of vitamins a, e, and k, which makes it way more than just a cook’s best friend.
Plus, it’s rich in flavorful fats that our bodies actually need. you can use it in everything from baking with ghee to drizzling over veggies or even using it in your comfort food recipes.
Feeling festive? ghee is perfect for special occasions or even just a sunday family dinner. it brings this gourmet flavor enhancement without needing to turn on your inner chef.
And trust me, once you taste this delight, you’ll understand why people are raving about it. it has a richness that regular butter just can’t replicate, and that’s saying something!
From the Kitchen to Your Table
So, whether you’re looking to elevate your morning toast with a smudge of aromatic ghee or need a delicious base for your vegetable sauté , this brown butter ghee is your go-to.
It’s versatile, making it a perfect kitchen staple for anyone who loves to cook.
And hey, if you’ve ever wondered about ghee storage tips, it’s super easy! once cooled, it can sit at room temperature or go in the fridge for longer shelf life.
Just imagine—all that flavor waiting for you to scoop it out and use it in your next meal.
Are you ready to switch gears and gather those ingredients? because i can’t wait to get you started on this rich and nutty journey! let’s whip up some homemade ghee; trust me, it’ll be the crown jewel of your cooking adventures.
Essential Ingredients Guide
Cooking is like a symphony, and the ingredients are the notes that make the magic happen. today, we’re diving into the core components every home cook needs.
This isn’t your run-of-the-mill grocery list; we’re talking premium ingredients that take your meals to the next level.
Premium Core Components
First things first, let’s break down detailed measurements . ideally, you want those numbers on point. in the u.s., we’re rolling with cups and teaspoons, while in the rest of the world, you’ll see liters and grams.
Don’t stress! it’s all about finding that balance. for example, if a recipe calls for 1 cup (227 g) of unsalted butter, just remember: it’s all in the game of conversions.
Now, how do you know if your ingredients are up to par? quality indicators are key. fresh herbs should smell bright, and spices should be robust.
When shopping for butter, go for that deep yellow color—that usually means it’s more flavorful!
Let’s talk storage guidelines . did you know that most oils can go rancid? keep them in a cool, dark place.
Your ghee? well, it has a longer shelf life thanks to the removal of milk solids. this nutty flavor bomb can last for weeks at room temperature if stored properly.
Just pop it in an airtight jar, and you're good to go!
Signature Seasoning Blend
Next up is the fun part: signature seasoning blends ! honestly, don’t underestimate the power of herbs and spices. essential combinations like chili powder and cumin can truly kick your dish into high gear.
Choosing the right herbs is like choosing the right outfit; you want something that complements your main dish perfectly. for instance, fresh basil pairs well with tomatoes, while thyme is a classic with poultry.
Bringing out the flavors can be done through aromatics —things like garlic and onion. if you think of them as your sous-chefs, your dishes will shine.
Don't forget, spices can differ regionally! for a taste of the southwest, try smoky paprika; for a little asian twist, you can’t go wrong with five-spice powder.
Smart Substitutions
Now, life isn’t always perfect, and sometimes you run out of essential ingredients. that’s where smart substitutions come in! if you’re out of butter, don’t sweat it! you can use ghee or even coconut oil for a light, dairy-free option.
Cooking with ghee gives the added benefit of a high smoke point , making it an ideal choice for sautéing or frying.
If you’re trying to cut out dairy, there are plenty of vegan alternatives . Many plant-based butter options have hit the shelf, so feel free to experiment with what's available.
Sometimes, you need a quick fix. emergency replacements are lifesavers. running low on spices? just grab whatever you think will work.
Even a sprinkle of salt can elevate a dish if you're in a pinch!
Kitchen Equipment Essentials
Alright, let's take a breather! you can’t whip together everything without the right tools. think of must-have kitchen equipment . a sharp knife, a good cutting board, and a solid saucepan will do wonders.
But if you’re low on funds, don’t worry—there are alternative options that can serve just as well. a thrifted pan can still do the trick.
A few preparation tips can go a long way too! always read your recipe before diving in. this way, you'll know when to chop, sauté, or blend.
And don’t forget your storage solutions ! for those herbs you bought and weren’t able to use, freezing them in ice cube trays can make sure they don’t go to waste.
Trust me, it saves a ton of heartache!
Speaking of flavor, have you tried cook brown butter ghee: rich & nutty yet? with all those essential ingredients in hand, let’s dive into the instructions.
This nutty delight is the perfect way to kick-start your journey into gourmet cooking.
Mastering the Art of Brown Butter Ghee
Oh my gosh, have you ever poured a bit of ghee over your roasted veggies? it’s – chef's kiss ! cooking with ghee has been a game changer for me.
It’s rich, nutty, and gives that gourmet flair to just about any dish. let’s tackle the professional cooking methods to cook brown butter ghee: rich & nutty .
You’ll learn not just how to make it but how to elevate your kitchen game overall.
Essential Preparation Steps
First things first, we gotta get prepped. that's where mise en place comes in. it’s just a fancy way to say “everything in its place.
” measure out your 1 cup of unsalted butter ahead of time, and if you’re going the salted route, grab that sea salt too.
Next up is time management. make sure to do all your prep before you turn on the stove. lightly wash those measuring cups and grab a small saucepan because you’ll need it.
This helps keep you organized and prevents that dreaded “where's my spatula?” moment.
And let’s not forget safety considerations! when you’re working with heat, make sure your surface is clear. no paper towels hanging off the edge! and keep those fingers safe.
Use a wooden spoon or a silicone spatula for stirring; they’re great for handling hot stuff without burning your hands.
Step-by-Step Process
-
Melt the Butter:
- Toss that unsalted butter into your small saucepan .
- Heat over medium-low until fully melted.
-
Brown the Butter:
- Stir occasionally. This is super important!
- After about 8- 10 minutes , it should be foamy and golden brown. You’ll notice a nutty aroma – that’s your cue to keep an eye on it. The magic happens here!
-
Clarify the Ghee:
- Remove it from the heat once you catch that fragrant goodness.
- Let it cool for a minute, then pour through a fine mesh strainer or cheesecloth into a heatproof jar. Remember to leave those dark milk solids behind – they’re not on the guest list!
-
Store:
- Let it cool completely before sealing it up. Store it in a cool, dark place or go ahead and pop it in the fridge for long-term goodness.
Expert Techniques
Now, believe me, it’s all in the details. first, watch that color closely. you want to catch it right before it goes from golden to burnt.
If you think it’s getting too dark, it probably is, so don’t be lazy – remove it from the heat!
Speaking of heat, utilize low heat for this process. it allows those milk solids to settle without burning. and don’t be afraid to get adventurous! toss in some herbs or spices like rosemary or garlic when browning the butter to create your own infused ghee recipes .
Success Strategies
Okay, we’ve all made mistakes in the kitchen. one of the most common? not paying attention while browning the butter.
You’d be shocked at how fast it can go from golden to a disaster. keep stirring and keep watching!
To ensure the best quality, always taste your ghee before serving. you want that rich, nutty flavor to shine through.
And if you make a big batch, ghee has a high smoke point which means it’s awesome for sautéing techniques, so don’t be shy about using it in all your favorite dishes or comfort food recipes.
And don't forget your ghee storage tips! if you leave it at room temp, it’ll last a couple weeks, but refrigeration gives it a longer life.
Think of it as a kitchen staple you can't live without!
Wrapping it Up
Now that you know how to nail down the cook brown butter ghee: rich & nutty recipe, you’re ready to impress your friends and family.
Top it over roasted veggies or slather it on fresh bread with a sprinkle of sea salt. trust me, gourmet flavor enhancement is your new best friend.
With all that said, let’s transition into more additional information to keep your cooking adventures rolling!
Pro Tips & Secrets
Let me tell ya, cooking with brown butter ghee is like adding magic to your dishes. this rich, nutty flavor is something you just can't get from regular butter.
So here are some of my go-to pro tips to elevate your ghee game!
First off, keep a close eye on your butter while it’s browning. oh my gosh, i can’t tell you how many times i’ve walked away for “just a sec” and came back to a burnt mess.
Set a timer or stay glued to the stove. for around 8- 10 minutes , stir gently, and once you start smelling that nutty aroma, you know it's cooking right.
For a time-saving technique, you can prep multiple batches and store properly . i make a big batch and throw it in a glass jar.
Just keep it in a cool place, and it'll stay good for weeks. it's like having a flavor bomb ready to go anytime you need it!
And speaking of flavor, toss in some garlic or rosemary while you’re browning the butter. it gives a whole new vibe—instant gourmet! seriously, this flavor enhancement is where your everyday meals can turn into something amazing.
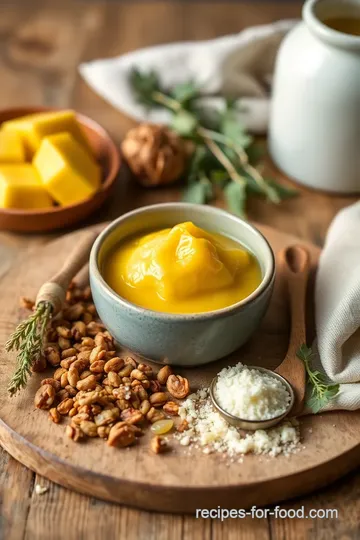
Perfect Presentation
Now let’s talk aesthetics, because who doesn’t love food that looks as good as it tastes? when you’re ready to plate your dish, think about color combinations.
A drizzle of your aromatic ghee over vibrant roasted veggies makes everything pop.
For garnishing, sprinkle some fresh herbs on top. it adds that gourmet touch and makes your dish feel elevated. plus, using a fine mesh strainer gives you a clean look when you pour your ghee anywhere.
That perfectly strained ghee is a real showstopper!
Try to present fluffy mashed potatoes with a good glug of brown ghee on top. It’s not just about taste; it’s about mouth-watering looks that make everyone go, “Wow!”
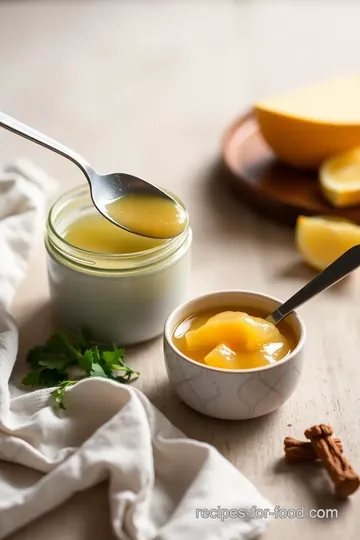
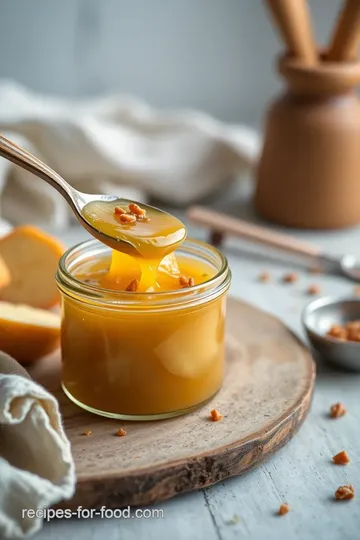
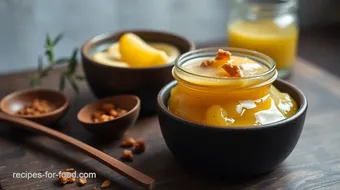
Storage & Make-Ahead
Now, if you’re wondering how long your homemade ghee will last, let me drop some knowledge. clarified butter like ghee has a long shelf life.
Store it in an airtight container and keep it in a cool, dark place—voila! you've got yourself a kitchen staple that can last up to three months .
If you want to stretch it even longer, chuck it in the fridge.
For reheating, just use a small saucepan on low. Don't blast the heat because you’ll wreck that beautiful nutty flavor. Remember, low and slow is the way to go!
Creative Variations
Feeling adventurous? let’s shake things up a bit with some creative variations . you can easily adapt flavors based on the season.
For a summer twist, add lemon zest to your ghee and use it to drizzle over grilled veggies. autumn? infuse it with a bit of cinnamon and nutmeg for those cozy, pumpkin-spiced vibes.
Got some dietary restrictions? you can swap out that butter for refined coconut oil to make a dairy-free alternative. it's awesome for those who are into vegan items but still want a touch of sophistication in their cooking.
Complete Nutrition Guide
Let’s get down to the nitty-gritty with a complete nutrition guide . one tablespoon of brown butter ghee has about 120 calories and 14 grams of fat .
But don’t sweat it! not all fats are created equal. the healthy fats in ghee can support a balanced diet.
Moreover, ghee is rich in vitamins a, d, and e, crucial for maintaining good health. so whether you're sautéing veggies or baking with ghee, you're getting all those ghee benefits without the guilt! just mind those portion sizes; a tablespoon goes a long way in adding flavor.
Wrap-Up
So there you have it, friends! cooking brown butter ghee is a fun adventure that unlocks so many delicious possibilities.
From its nutty flavor to its versatility in the kitchen, it's a game changer! whether you're sautéing, drizzling, or spreading, you'll find that it adds a rich depth to your meals.
Get out there and try this out! I promise, you won’t just be cooking—you'll be creating flavors that make your taste buds dance. Happy cooking, and may your ghee always be golden!
Frequently Asked Questions
What is Cook Brown Butter Ghee: Rich & Nutty, and how is it different from regular ghee?
Cook Brown Butter Ghee: Rich & Nutty is a flavorful twist on traditional ghee, made by browning the butter before clarifying it. This process adds a rich, nutty flavor and a caramel-like complexity, setting it apart from regular ghee, which has a more neutral taste.
Can I use any type of butter for making brown butter ghee?
While the recipe specifically calls for unsalted butter to control the saltiness, you can opt for salted butter if you prefer a salted version. However, make sure to adjust the salt in your final dishes accordingly.
What are some practical cooking tips for making Cook Brown Butter Ghee: Rich & Nutty?
To make the best brown butter ghee, keep the heat on medium-low to avoid burning, and stir constantly to monitor the color. Watch for the foaming to subside and for the butter to turn a deep golden brown, releasing a nutty aroma. You can also add herbs or spices during cooking for added flavor.
How should I store my brown butter ghee?
Once your brown butter ghee has cooled completely, pour it into an airtight container. You can store it at room temperature for several weeks or refrigerate for longer shelf life. Just ensure it is kept in a cool, dark place to maintain its flavor.
Are there any nutritional considerations with brown butter ghee?
Brown butter ghee is calorie-dense, offering about 120 calories per tablespoon. It contains no carbohydrates or protein, making it suitable for low-carb and ketogenic diets. However, moderation is key due to its high fat content. Always be mindful of how it fits into your overall daily nutritional intake.
Can I make variations of Cook Brown Butter Ghee: Rich & Nutty?
Absolutely! You can create variations like herbed ghee by adding fresh herbs or garlic for savory notes. Additionally, spices like cumin or turmeric can be stirred in during cooking for a unique flavor twist. Don’t hesitate to experiment and find a blend that suits your palate!
Cook Brown Butter Ghee: Rich & Nutty Card
⚖️ Ingredients:
- 1 cup (2 sticks, 227 g) unsalted butter
- Optional: 1 tsp (5 g) sea salt (for salted version)
🥄 Instructions:
- Step 1: Place the unsalted butter in a small saucepan.
- Step 2: Heat over medium-low until fully melted.
- Step 3: Stir occasionally with a wooden spoon or silicone spatula.
- Step 4: Cook for 8-10 minutes until the butter foams and turns golden brown.
- Step 5: Watch closely; youll notice a nutty aroma and browned milk solids settle at the bottom.
- Step 6: Remove from heat once the butter is browned and fragrant.
- Step 7: Let cool for a minute; then pour through a fine mesh strainer or cheesecloth into a heatproof jar, leaving the milk solids behind.
- Step 8: Allow the ghee to cool completely before sealing.
- Step 9: Store in a cool, dark place or refrigerate for long-term storage.
Previous Recipe: Cozy Autumn Breakfast: Bake Sweet Potatoes & Apples for Breakfast
Next Recipe: Make Epic Paleo Nachos in 30 Minutes: Delicious & Guilt-Free Game Night Treat