No-Cook Chia Seed Pudding: Quick & Healthy Delight
Craving a wholesome treat? This no-cook chia seed pudding is my favorite quick & healthy snack! With creamy texture and delicious toppings, you'll love it.

- Discovering the Delights of No-Cook Chia Seed Pudding
- Essential Ingredients Guide: Making Cooking a Breeze
- Essential Steps for Professional Cooking at Home
- Step-by-Step Process: Cooking Made Easy
- Pro Tips & Secrets for No-Cook Chia Seed Pudding – Quick & Healthy
- Storage & Make-Ahead Techniques
- Creative Variations
- Expert FAQ Solutions
- Conclusion: The Pudding of Your Dreams
- Recipe Card
Discovering the Delights of No-Cook Chia Seed Pudding
So, let me take you back to that one morning when i was running late. like, really late . i was rummaging through my kitchen, stressed out and searching for something quick but healthy, you know? that's when i stumbled upon my bag of chia seeds .
Oh my gosh, i remembered a recipe for no-cook chia seed pudding - quick & healthy ! talk about a lifesaver! in just 10 minutes, i had a creamy, delicious breakfast waiting for me in the fridge.
If you’re curious about how to whip up this tasty treat, stick around.
The Lowdown on Chia Seed Pudding
Alright, let's dive into a little history here. chia seeds are no joke ! they trace back to the ancient aztecs and mayans, who valued them as a superfood.
Fast forward to today, and they’re popping up everywhere! people love them because they're packed with nutrition and easy to prepare.
This no-cook recipe is definitely modern-day magic. with minimal effort, you get a high fiber snack that’s also gluten-free and vegan.
Plus, it can serve as an easy breakfast or afternoon pick-me-up. just toss the ingredients together, let them chill, and in about two hours , you’ll have a bowl of rich, creamy goodness that’s ready to rock!
And let’s talk about costs! chia seeds are pretty affordable, and you can stretch them a long way. for about $5-$10 , you can get enough seeds to make several servings.
We're talking 4 servings from this recipe! so if you're on a budget, this is a super easy, wallet-friendly option that you can prep at the beginning of the week for those busy mornings.
Why You’ll Love This Recipe
Now, let’s chat benefits. incorporating chia seed pudding into your routine means you’re diving into a bowl of nutrition. these tiny seeds are packed with antioxidants, fiber, and protein .
Chia seed nutrition is off the charts! you can whip this up for breakfast meal prep or have it as a nutritious dessert later in the day.
Not only that—but with the ability to dress it up with fresh fruit toppings or nut combinations, it’s hard to get bored.
Oh, and did i mention the health benefits? we're talking about a few key advantages like keeping you full longer, which can help curb those mid-afternoon snack cravings.
Honestly, it’s like having a guilt-free dessert at any time of day!
This recipe shines during special occasions too. you can serve it at brunch, and your friends might just think you’re a culinary genius! they won’t even know you threw it together in minutes.
Whether you’re entertaining guests or just treating yourself, who wouldn't love digging into a bowl of creamy bliss?
The Transition to Ingredients
Are you ready to get started? trust me, once you prepare your first batch of no-cook chia seed pudding , you’ll never look back.
It’s so easy! so grab those chia seeds , a cup of almond milk , and your favorite natural sweetener, and let’s turn this thing into a delectable creation.

Essential Ingredients Guide: Making Cooking a Breeze
Listen up, friends! if you’ve ever found yourself staring into your fridge, wondering how to whip up something delicious without a hint of a plan, i’ve got your back.
Let’s break it down together into some essential ingredients that’ll make your life way easier in the kitchen.
Premium Core Components
Okay, first things first—let’s talk about your premium core components . You want to keep your pantry stocked with the good stuff.
Measurements matter ! for those of you still figuring out the whole metric thing, here's a quick cheat sheet: 1 cup equals about 240 ml, and 1 tablespoon is about 15 ml.
Knowing this can save you from a ho-hum dinner disaster. also, when you’re choosing ingredients, look for quality indicators . fresh herbs should smell vibrant, while dried spices should have a strong aroma—if they smell like yesterday’s laundry, it’s time for a new bottle!
Now, let’s not forget about storage guidelines . most spices are best kept in a cool, dark place, and pantry staples usually last about six months to a year.
Fruits and veggies? they might be in trouble after a week or so—keep an eye on them. and when shopping, don’t just grab the first thing you see.
Look for freshness tips : check the dates, poke around in the produce section, and push those tomatoes to make sure they aren't as squishy as a soggy sponge.
Signature Seasoning Blend
Now, who doesn’t love a good mix of flavors? that’s where your signature seasoning blend kicks in! start with some essential spice combinations like garlic powder, onion powder, and a bit of paprika for a classic base.
About herbs— don’t be shy ! basil, thyme, and cilantro are a great place to start. you can pair them with proteins or even toss them into an easy no-cook recipe like a fresh salad.
And let’s not forget the flavor enhancers and aromatics —a splash of lemon juice or a dollop of dijon mustard can take your dish from ‘meh’ to ‘wow’ in seconds.
Who knew something so simple could turn an everyday meal into a culinary masterpiece?
Smart Substitutions
Life happens, right? so, if you’re missing an ingredient, it doesn’t have to ruin your cooking vibe. you can make smart substitutions .
Got a recipe that calls for heavy cream? swap in canned coconut milk for a creamy pudding that’s also vegan.
If you can’t find chia seeds for your no-cook chia seed pudding - quick & healthy , why not try ground flaxseed? it won’t be the same, but it’ll still be tasty!
And if you need a quick fix, keep an eye out for common alternatives —use applesauce instead of oil for a lighter vibe, or swap dairy for alternative milk options if you’re feelin’ plant-based.
Kitchen Equipment Essentials
Let’s wrap it up with some kitchen equipment essentials . you don’t need a fancy setup, just a few good tools.
First, grab yourself a solid mixing bowl because you’ll need it for everything. a whisk or spoon? absolutely necessary!
Also, if you can get your hands on some airtight containers for storage, you’ll thank me later. they keep your snacks fresh and make meal prep a breeze! don’t forget to keep it organized—label your jars, and your future self will love you for it.
Transition to Delicious Recipes
So, there you have it, folks! with these tips in your back pocket, you’re ready to tackle anything that hits your kitchen.
Now, let's get to the fun part—cooking! try out the no-cook chia seed pudding - quick & healthy recipe to satisfy those cravings.
You’ll whip that up in no time, and it’s a perfect way to kick-start those healthy eating habits while enjoying a nutritious dessert .
Get that mixing bowl out, and let’s do this!
Essential Steps for Professional Cooking at Home
Hey there, fellow foodies! if you’re ready to step up your kitchen game and dive into some professional cooking methods, you’ve landed in the right spot.
An essential foundation in cooking is mis-en-place. so, let’s break it down into easy, bite-sized pieces.
Mise en Place: The Secret Sauce
First off, let’s talk about mise en place . it’s a fancy french term that just means prepping all your ingredients before you start cooking.
Trust me, this will save you time and sanity, especially if you’re whipping up something like no-cook chia seed pudding - quick & healthy .
Take a moment to measure your chia seeds, almond milk, and any toppings you want.
While you’re at it, organize your workspace. clear off those stray canisters and use bowls for your prepped ingredients. ever tried cooking with a cluttered counter? it’s a disaster! always remember – clean kitchen, clear mind .
Mastering Time Management
Next, let’s discuss time management . when you're cooking, timing is everything. always keep track of how long things take. it might sound tedious, but setting timers can be a game-changer.
If a recipe says chill for at least 2 hours , set an actual timer. it’ll help you prep something else or kick back with a cup of tea while you wait.
Safety Comes First
Speaking of chilling, don’t ignore safety. it’s vital to keep your cooking area tidy and safe. make sure that your knives are sharp, and keep those pesky kitchen towels away from hot surfaces.
And remember – don’t be a hero! if you feel overwhelmed, step back and take a breather.
Step-by-Step Process: Cooking Made Easy
Now, onto the fun part! Cooking is like following a treasure map with each step leading to your delicious reward.
-
Combine Dry Ingredients : Start with your chia seeds, just ½ cup in a bowl. Sprinkle in a pinch of salt for flavor.
-
Wet ingredients : in another bowl, mix together 2 cups of almond milk , 2 tablespoons of sweetener (like honey or maple syrup) , and 1 teaspoon of vanilla extract .
Give that a good whisk!
-
Get Together : Pour the wet mix into the chia seeds and stir it up. It's like a little party in the bowl!
-
Stir and Chill : Let it sit for about 5 minutes , then give it another stir to keep the clumps away.
-
Time to Chill : Transfer to jars or an airtight container and pop it in the fridge for at least 2 hours or overnight if you're really planning ahead.
-
Serve It Up : Once it’s thickened, add your favorite toppings like fresh fruits or nuts. What a healthy breakfast recipe or snack option!
Expert Techniques for Perfect Results
Here’s where we can get all fancy-like. You can truly elevate your game with a few expert techniques.
-
Quality Checkpoints : Always give a glance at your mixture before chilling. It should look like it’s coming together nicely, not a lumpy mess.
-
Troubleshooting Tips : If your pudding isn’t thickening, no worries! Just let it chill longer; chia seeds can be fickle sometimes.
Success Strategies
Even the pros run into sticky situations sometimes. Here are common mistakes to avoid:
-
Don't Rush : Patience is key. If you don’t let it chill long enough, you might end up with chia soup instead of creamy goodness.
-
Quality Assurance : Taste as you go! You can always tweak the sweetness or throw in some cocoa powder for a chocolate kick.
-
Make-Ahead Options : This recipe is a dream for meal prep. Make several jars at once for those busy mornings.
Let’s be honest, who can resist something that’s not just easy , but also packed with chia seed benefits ? You’ve got a high fiber snack that’s super satisfying!
In the end, professional cooking isn’t about being perfect. It’s about enjoying the process. And that’s a powerful part of healthy eating habits !
Ready to dive deeper? Next up, let's explore some Additional Information to keep your cooking journey flavorful and fun!
Pro Tips & Secrets for No-Cook Chia Seed Pudding – Quick & Healthy
Let’s talk about the No-Cook Chia Seed Pudding - Quick & Healthy that’s been my go-to lately. Seriously, I whip this up in just 10 minutes and then let the fridge do its thing, you know? If you're looking to impress without the stress, I've got some chef’s secrets for you!
Chef's Personal Insights
First off, chia seeds are like little magic balls of joy ! not only are they packed with chia seed benefits like high fiber and protein, but they create this luscious, creamy texture without even boiling a pot of water.
Honestly, nothing's easier.
Time-Saving Techniques
Wanna save time? make a big batch! go ahead and prep multiple jars for the week. they'll sit pretty in your fridge, waiting for you to grab them on those rushed mornings.
Meal prep ideas are where it’s at!
And here’s another tip: shake those jars instead of stirring them in a bowl. Just pop the lid on, give it a good shake, and you’re good. No clumps!
Flavor Enhancement Tips
Feeling fancy? add some natural sweeteners like a dash of maple syrup or honey to sweeten the deal. you can jazz it up even more with spices like cinnamon or nutmeg.
Trust me, it transforms this pudding from basic to fabulous!
Perfect Presentation
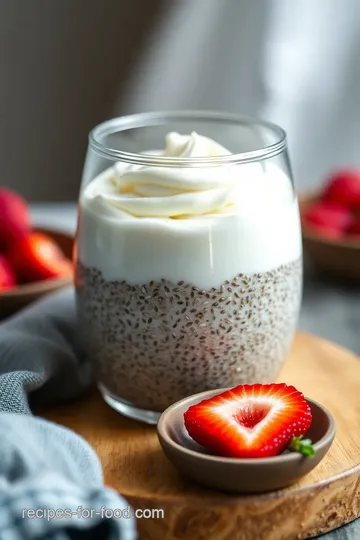
Okay, let’s talk visuals. one of the best parts of this dish? plating it up. you want it to look as good as it tastes.
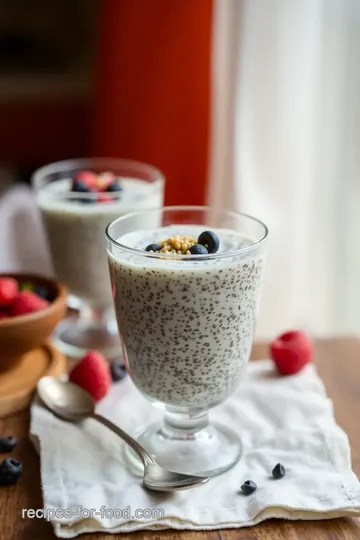
Use clear jars so that you can layer the pudding with fresh fruit toppings like berries or bananas. not only does it add color but you’re also getting those antioxidant-rich foods in there.
And who doesn’t love a pop of color on their breakfast table?
Your garnishes are your friends! a sprinkle of nuts or seeds adds a nice crunch. and if you're feeling adventurous, a few coconut flakes might just take it to the next level.
Remember, we eat with our eyes first!
Storage & Make-Ahead Techniques
Okay, so this is a game-changer: you can totally make this pudding ahead of time! just remember, keep it in an airtight container and it can last in the fridge for up to 5 days.
But let's be real, it never lasts that long in my house!
When it's time to indulge, just stir it up if it’s thickened a bit too much, add a splash of almond milk, and you’re golden. How easy is that?
Creative Variations
Now, let’s get creative! the beauty of easy no-cook recipes like this is you can adapt them based on what you have.
Go ahead and swap out the almond milk for coconut milk for a tropical twist. trust me, it feels like a mini-vacation in a jar!
Oh, and you can make chocolate chia pudding by mixing in some cocoa powder! Yup, healthy dessert for breakfast, right?
Complete Nutrition Guide
Let’s not forget the nutrition! each serving has about 10 grams of fiber - are you kidding me? it totally matches with healthy eating habits .
Plus, with only 180 calories, it’s the perfect low-calorie dessert that keeps you full and satisfied. perfect for when you’re craving something sweet but want to keep it nutritious.
Expert FAQ Solutions
Now, you might be wondering, what if it clumps? no worries! making sure to stir the mixture twice while it’s chilling will help prevent that.
Keep those high fiber snacks smooth and silky! and if you’re unsure about vegan options, guess what? this pudding is vegan chia pudding , so dig in without a care!
Feeling adventurous and want to try something new? Mix in some pumpkin puree for a fall-inspired dessert. Yes, please!
Conclusion: The Pudding of Your Dreams
There you have it, friends! the no-cook chia seed pudding - quick & healthy is your new secret weapon in the kitchen.
Whip it up for breakfast or as an easy, wholesome snack recipe ; you can't go wrong!
look into into this delicious and nutritious treat; I promise your taste buds will thank you. So get those seeds soaking, and let the fridge do the rest. Happy pudding making!
No-Cook Chia Seed Pudding: Quick & Healthy Delight Card

⚖️ Ingredients:
- 1/2 cup chia seeds (about 80g)
- 2 cups almond milk (or any milk of choice, 480 mL)
- 2 tablespoons maple syrup (or honey) (30 mL)
- 1 teaspoon vanilla extract (5 mL)
- Pinch of salt
- Fresh fruits (e.g., berries, banana slices)
- Nuts or seeds (e.g., almonds, walnuts)
- Coconut flakes (optional)
- Granola (optional)
🥄 Instructions:
- Step 1: In a bowl, add chia seeds and a pinch of salt.
- Step 2: In another bowl, whisk together the almond milk, maple syrup, and vanilla extract.
- Step 3: Pour the wet mixture into the bowl with the chia seeds. Stir well to combine.
- Step 4: Allow the mixture to sit for 5 minutes, then stir again to prevent clumping.
- Step 5: Transfer the mixture to an airtight container or individual jars. Cover and refrigerate for at least 2 hours or overnight.
- Step 6: Once chilled and thickened, spoon the pudding into serving bowls or jars. Top with fresh fruits, nuts, and any other desired garnishes.
Previous Recipe: My Kitchen-Tested Baked Chickpea Falafels with Fresh Herbs: The Best Recipe!
Next Recipe: How to Make the Best Blend Strawberry Banana Chia Smoothie