Deliciously Easy Banana Nut Bread
Bake Banana Nut Bread - Deliciously Easy! Enjoy this moist, flavorful recipe with walnuts that's perfect for breakfast or snacking. Check it out now!

- Finding Comfort in Every Slice: Bake Banana Nut Bread - Deliciously Easy
- Why This Recipe is a Must-Try
- The Deliciously Healthy Perks
- Essential Ingredients Guide for Baking Banana Nut Bread
- Baking Like a Pro: Your Guide to a Deliciously Easy Banana Nut Bread!
- Bake Banana Nut Bread - Deliciously Easy: The Ultimate Guide
- Frequently Asked Questions
- Recipe Card
Finding Comfort in Every Slice: Bake Banana Nut Bread - Deliciously Easy
You ever have one of those days where everything just feels a bit too much? like, i’ll throw in a load of laundry, trip over the dog’s toys, and somehow, my coffee goes cold before i even get that first sip.
It’s chaos, my friends! but then, i remember how a simple homemade banana nut bread can turn the tide. oh my gosh, the scent of baked banana bread wafting through the house is like a warm hug! and trust me, when you bake banana nut bread - deliciously easy, it’s like hitting the comfort food jackpot.
Banana bread has a little history, you know? it popped up during the great depression when people were all about using up those ripe bananas instead of wasting them.
Talk about a frugal kitchen hero! today, it’s a staple in many households, beloved from coast to coast. it’s easy on the wallet and the taste buds too.
You can whip it up in no time – we’re talking about 15 minutes prep and just 60 minutes baking .
Seriously, it doesn’t get much easier than this!
Why This Recipe is a Must-Try
So, you might be wondering, what makes this easy banana bread recipe stand out in a sea of others? first off, we’re using ripe bananas that bring that natural sweetness.
And let’s not forget those walnuts giving it that satisfying crunch. you know the feeling when you bite into something warm and soft, and it just reminds you of home? yeah, that’s what i’m talking about.
This isn’t just any banana loaf. we’re crafting a moist banana nut bread that’s perfect for breakfast, afternoon snacks, or just whenever you want a bite of goodness.
Plus, it’s totally kid-friendly! i mean, who doesn’t love the combination of sweet bananas and nuts? it makes for a great sweet banana snack , and even for those who might be a bit iffy about nuts, you can always swap them out with chocolate chips for a delicious twist.
Now, about time and costs – it’s super straightforward. you can get 8 servings from this recipe, and it won’t break the bank.
You’ve probably got most of the ingredients hanging around in your pantry already. use up those ripe bananas and get your family together for some bonding over simple baked banana bread .
Nothing like baking together to create memories, right?
The Deliciously Healthy Perks
You might think, "bread? isn’t that bad for you?" well, guess what? this isn’t just any loaf; we’ve got some health perks happening here too! banana nut bread provides potassium from our beloved bananas and healthy fats from the walnuts.
It’s a win-win! plus, when you bake at home, you control the ingredients, making it easier to create variations like dairy-free banana nut bread if you need it.
And let’s talk special occasions. this nutty banana loaf is perfect for brunch gatherings, parties, or simply as a thoughtful homemade gift.
Nobody can resist a loaf fresh from the oven. you can also serve it warm with a spread of cream cheese on the side – it's divine!
When it comes to baking tips for banana bread , keep it simple: don’t over-mix your batter, use ripe bananas (the browner, the better!), and definitely let it cool before slicing.
If you do it right, you’ll end up with the perfect banana bread texture that’ll wow your friends and family.
So, are you ready to dive into this easy baking adventure? it’s time we gather the ingredients and get started on this delicious journey.
Trust me; you’re gonna love how well this turns out!
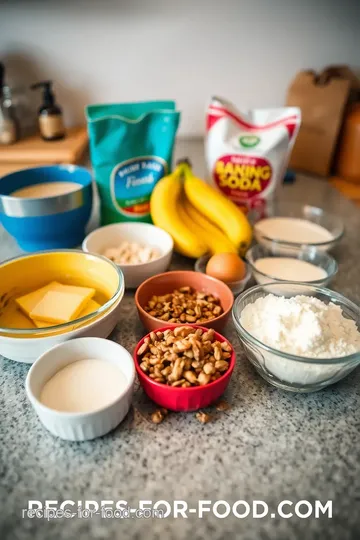
Essential Ingredients Guide for Baking Banana Nut Bread
Oh my gosh, if you're diving into the world of baking, especially with something as comforting as banana nut bread , knowing your ingredients inside out is an absolute must! this isn’t just any bread; we’re talking about a moist banana nut bread filled with crunchy walnuts that'll make your taste buds dance.
Whether it’s for breakfast or a cozy afternoon snack, getting the right ingredients will guarantee that you bake the best banana bread with nuts.
Let's break it down.
Premium Core Components
When you’re gearing up to Bake Banana Nut Bread - Deliciously Easy , you gotta have your core ingredients ready.
-
Bananas: Use 3 medium ripe bananas , about 1 ½ cups when mashed. A perfect option for using those ripe bananas you might be wondering what to do with!
-
Butter: You’ll want ½ cup (115g) unsalted butter , softened. This helps create that delicious, moist texture we all love in a good banana bread.
-
Sugar: Grab ¾ cup (150g) granulated sugar for sweetness. You can also use brown sugar for a richer flavor. It’ll bring out that comfort food vibe.
-
Eggs: Two large eggs will give your bread structure and moisture.
-
Vanilla Extract: A teaspoon of vanilla extract adds warmth and depth.
-
Flour: Use 1 ½ cups (190g) of all-purpose flour to hold everything together.
-
Baking Soda & Salt: Essential game players! You need 1 teaspoon (5g) baking soda and ½ teaspoon (3g) salt to balance out the sweetness.
-
Walnuts: Finally, toss in ½ cup (60g) chopped walnuts for that nutty crunch.
Signature Seasoning Blend
You might be surprised, but the secret to a deliciously easy banana nut bread often lies in the little extras we throw in!
-
Spices : Want to add a punch? A sprinkle of cinnamon or nutmeg can elevate the flavor.
-
Herbs : Not your typical choice, but think about some fresh basil paired with bananas for a unique twist.
-
Flavor Enhancers : Consider a hint of orange zest or even dark chocolate chips for those moments when you just want something special!
Smart Substitutions
Sometimes life throws curveballs! Maybe you’re out of walnuts. No biggie!
-
Common Alternatives : If you're short on walnuts, almonds or pecans do the trick.
-
Dietary Modifications : How about going dairy-free? Use coconut oil instead of butter for a fantastic flavor.
-
Emergency Replacements : No eggs? Flaxseed and water can serve as a quick substitute.
-
Seasonal Options : When fall rolls around, throw in some spiced banana bread with pumpkin or apple!
Kitchen Equipment Essentials
Now that we’ve got our ingredients, let’s talk equipment. You want to make this as simple as possible!
-
Must-Have Tools : You’ll need mixing bowls and a whisk, of course. A good loaf pan also makes a world of difference.
-
Alternative Equipment : Don’t have a mixer? Use a sturdy fork to mash those bananas! It gets the job done and gives you a workout.
-
Preparation Tips : Make sure your butter is at room temperature for the best creaming with sugar.
-
Storage solutions : once your banana nut bread is done, let it cool completely. then, for best freshness, store it in an airtight container.
Oh, and you can freeze it for up to three months!
And there you have it! this easy banana bread recipe combines simple ingredients with smart, fun twists. imagine walking into a kitchen that smells divine, thanks to your homemade banana nut bread .
It’s not just about the recipe; it’s about the memories made while baking.
Next, let's get into the nitty-gritty of how to bake banana bread —because trust me, you’re gonna want to whip this up in no time!
Baking Like a Pro: Your Guide to a Deliciously Easy Banana Nut Bread!
Alright, my fellow kitchen adventurers! today, we’re diving into the art of professional cooking methods, particularly focusing on how to bake banana nut bread - deliciously easy .
Honestly, who doesn’t love a warm slice of moist banana nut bread fresh from the oven? it’s one of those comforting recipes that feels like a hug from grandma.
So, let’s get started!
Essential Preparation Steps
Before you even think about turning on the oven, let’s get our mise en place sorted. this french cooking concept simply means having all your ingredients prepped and ready to go.
Grab your ripe bananas , soft butter, sugar, and walnuts. you want everything right at your fingertips. trust me, it makes everything a breeze!
Now, onto timing and organization. a little tip: set a timer! this is a game changer. while the bread is baking for 60 minutes , take that time to clean as you go.
This not only keeps your space tidy but helps you focus on the fun part—baking!
Safety first! Make sure you’re using oven mitts, especially when you pull that hot loaf out. Burned fingers? No thanks!
Step-by-Step Process
Let’s break it down with some clear instructions. I’ve got your back with numbered steps —it’s like a treasure map, but instead of gold, we’re searching for delicious bread!
- Preheat your oven to 350° F ( 175° C). This is crucial! A hot oven is on your side.
- In a bowl, mash 3 medium ripe bananas until smooth. This sweet goodness is the secret to that perfect banana bread texture .
- Cream together ½ cup softened unsalted butter and ¾ cup sugar until it’s light and fluffy. Seriously, this is where the magic starts.
- Add 2 large eggs one at a time, mixing well after each. This gives your bread a nice structure.
- Next, stir in those mashed bananas and 1 teaspoon vanilla extract . Smell that? It’s heavenly!
- In another bowl, whisk together 1 ½ cups flour , 1 teaspoon baking soda , and ½ teaspoon salt .
- Slowly fold the dry mixture into the wet, but don’t over-mix! You want a chunky batter—not a smooth one.
- Toss in ½ cup chopped walnuts . Who doesn’t love a good crunch?
- Pour your batter into a greased loaf pan.
- Bake for 60 minutes . Pro tip: Stick a toothpick in the center. If it comes out clean, you’re golden!
- Let it cool in the pan for 10 minutes before transferring to a cooling rack.
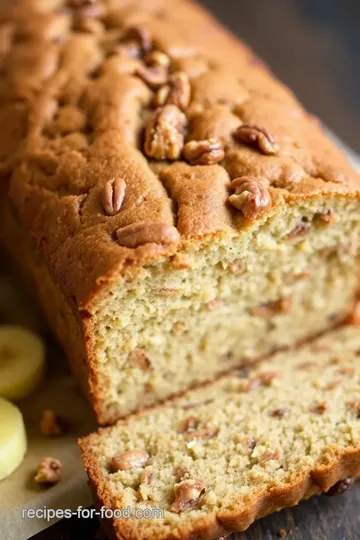
Expert Techniques
Once you’ve baked your banana nut bread , how do you know it’s the best banana bread with nuts ? check for a golden-brown crust and a beautiful rise.
If it sinks, you might have mixed too much—don’t fret; we all learn from our baking blunders!
Quality checks are essential! Use that toothpick trick for reassurance, and don’t forget to let it cool completely before slicing. Warm bread = potential disaster at the cutting board.
Success Strategies
We all make mistakes, and that’s part of the fun! a common one is over-mixing the batter. keep it simple, friends—the less you mess with it, the better the texture.
Oh, and if you want to save time, you could make a make-ahead option . the flavors deepened if you let it rest overnight!
Want to store it? Wrap it tightly and it can chill in your freezer for up to three months. Not many comfort food recipes are this forgiving.
When it’s finally time to serve, consider a dollop of cream cheese or a drizzle of honey. It’s amazing how those little touches elevate your homemade banana nut bread !
With these tips, you’re not just making banana bread; you’re creating memories. i still remember the first time my mom showed me how to bake this.
The kitchen was a disaster, but the smell wafting through the house made it all worth it. it’s one of those sweet banana snacks that always brings a smile.
And while we’re on the subject of memories, let’s talk about additional information to make your baking even more enjoyable !
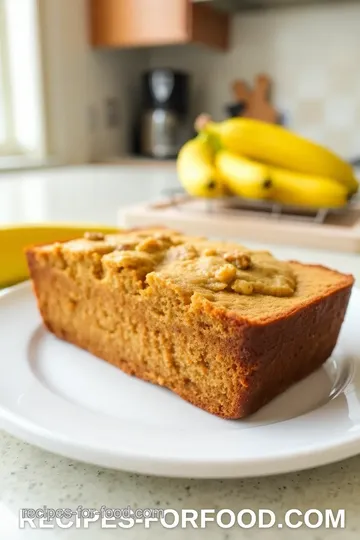
Bake Banana Nut Bread - Deliciously Easy: The Ultimate Guide
Ah, banana nut bread! there’s something so comforting about it. it’s like a warm hug in loaf form, right? whether you’re whipping it up for breakfast or using it as a sweet snack, you really can’t go wrong.
Plus, it’s a fantastic way to use up those ripe bananas cluttering your kitchen counter. let’s dive into some key tips and tricks to ensure your homemade banana nut bread comes out perfectly every single time!
Pro Tips & Secrets
Alright, let’s set the stage for success. First off, always choose very ripe bananas . I’m talking brown and spotty! The more ripe they are, the sweeter your bread. It’s like magic!
Now, about that butter : soften it just enough so it’s creamy, but don’t melt it. this will help you achieve that perfect moist banana nut bread texture.
Another pro tip? mix your wet ingredients into the dry until just combined. over-mixing can lead to a gummy texture, and nobody wants that!
If you’re short on time, consider grating the bananas instead of mashing them. it saves a couple of minutes, and honestly, it feels a tad less messy.
Plus, for an extra flavor kick, sprinkle in some cinnamon or nutmeg—it’s like a cozy fall festival in your loaf!
Perfect Presentation
Here’s where you can let your creativity flow. when it comes to plating , try slicing the banana nut bread thick—about an inch.
Stack them casually on a plate for that rustic bakery vibe. garnish with a sprinkle of powdered sugar or a drizzle of honey for a touch of elegance.
Think about color combinations too. a bright fruit salad or some seasonal berries next to that golden loaf makes everything pop! and if you're feeling fancy, serve it with a dollop of cream cheese.
It’s kinda like a sweet genie granting your breakfast wishes.
Storage & Make-Ahead
Now, who doesn’t love a recipe that’s not just delicious but easy to store? to keep your banana nut bread fresh, wrap it tightly in plastic wrap or aluminum foil—trust me, it works wonders! you’ll want to consume it within about 3-4 days at room temperature.
After that, toss it in the freezer for later munching.
When you’re ready to eat some cold banana loaf goodness, simply pop it in the microwave for about 15 seconds, or if you’re feeling fancy, toast those slices for added crunch.
Creative Variations
Now let’s get into flavor adaptations . Feeling adventurous? Swap walnuts for pecans or even add in chocolate chips for a sweet twist! Or how about throwing in some shredded coconut for a tropical vibe?
If you’re trying to impress guests, mix in dried fruit like cranberries or cherries. or, if you’re looking for some healthy banana nut bread options, use whole wheat flour and reduce the sugar a bit.
Your tastebuds won’t even notice the difference!
Complete Nutrition Guide
Okay, let’s chat nutrition. so, a slice of this moist banana nut bread packs roughly 180 calories , but it’s filled with good stuff, like fiber from bananas and a bit of protein from the nuts.
If you're watching your sugar intake, you can definitely play around by cutting down on the sweetness or switching to healthier alternatives like honey.
When considering your portions, think about your mood—if you want it for breakfast, keep a slice smaller. But if it's an afternoon treat with coffee, why not go for a heartier slice? After all, it’s all about balance, right?
Alright, my foodie friends, bake banana nut bread - deliciously easy! with these tips, you’ll not only nail that comfort food recipe but also make it uniquely yours .
Remember, cooking should be fun! don’t stress if things don’t go perfectly; every baker has had their mishaps—i sure have.
Have fun experimenting, and don’t forget to share a slice with your loved ones. happy baking!
Frequently Asked Questions
What are some tips for making my Bake Banana Nut Bread - Deliciously Easy even more flavorful?
To enhance the flavor of your Banana Nut Bread, use very ripe bananas with brown spots, as they offer the sweetest taste. You can also incorporate spices like cinnamon or nutmeg into the batter for added warmth. For a richer flavor, consider substituting brown sugar for granulated sugar, or add a tablespoon of sour cream or yogurt for extra moisture.
Can I customize the nuts in my Bake Banana Nut Bread - Deliciously Easy?
Absolutely! While walnuts are traditional in banana nut bread, you can easily swap them for pecans, almonds, or even hazelnuts based on your preference. You could also omit the nuts entirely or replace them with chocolate chips for a sweeter twist!
How should I store leftovers of my Bake Banana Nut Bread - Deliciously Easy?
To keep your banana nut bread fresh, store it in an airtight container at room temperature for up to 3 days. If you want to keep it longer, you can freeze slices in a freezer-safe bag for up to 3 months. Just be sure to let it cool completely before slicing and freezing to maintain its texture.
What is the best way to know when my Bake Banana Nut Bread - Deliciously Easy is done baking?
The best way to check for doneness is to insert a toothpick into the center of the loaf; it should come out clean or with a few crumbs. Baking times may vary based on your oven, so start checking around the 50-minute mark to avoid over-baking your bread.
Can I make this recipe dairy-free or gluten-free?
Yes! You can substitute the unsalted butter with coconut oil or a dairy-free margarine for a dairy-free version. For a gluten-free option, substitute the all-purpose flour with a 1:1 gluten-free flour blend. Make sure the other ingredients are also gluten-free to avoid cross-contamination.
Deliciously Easy Banana Nut Bread Card

⚖️ Ingredients:
- 3 medium ripe bananas (about 1 ½ cups mashed or 400g)
- ½ cup (115g) unsalted butter, softened
- ¾ cup (150g) granulated sugar
- 2 large eggs
- 1 teaspoon (5ml) vanilla extract
- 1 teaspoon (5g) baking soda
- ½ teaspoon (3g) salt
- 1 ½ cups (190g) all-purpose flour
- ½ cup (60g) walnuts, chopped
🥄 Instructions:
- Step 1: Preheat the oven to 350°F (175°C).
- Step 2: In a mixing bowl, mash the ripe bananas with a fork until smooth.
- Step 3: In a separate bowl, cream together the softened butter and sugar until light and fluffy.
- Step 4: Add the eggs one at a time, mixing well after each addition.
- Step 5: Stir in the mashed bananas and vanilla extract.
- Step 6: In another bowl, whisk together the flour, baking soda, and salt.
- Step 7: Gradually add the dry ingredients to the wet ingredients, mixing just until combined.
- Step 8: Fold in the chopped walnuts.
- Step 9: Pour the batter into a greased or parchment-lined loaf pan.
- Step 10: Bake for 60 minutes or until a toothpick inserted into the center comes out clean.
- Step 11: Allow cooling in the pan for 10 minutes, then transfer to a cooling rack to cool completely.
Previous Recipe: Deliciously Zesty: Bake Jiffy Cornbread with Bold Flavors in 30 Minutes
Next Recipe: Easy & Juicy Sautéed Shrimp Pasta with Fresh Flavor: A Family Favorite